Follow us
How to Install Metal Roofing
By James Fitzgerald
November 25, 2021
Installing a Metal Roof at a Glance
Step 1: Measure roof and order materials
Step 2: Remove old roofing materials
Step 3: Repair damage
Step 4: Install underlayment
Step 5: Install edging
Step 6: Add sealant tape and closure strips
Step 7: Install metal panels
Step 8: Install flashing
Metal roofing has exploded in popularity in recent years, mainly due to the several advantages it offers over conventional asphalt shingles. Metal roofs are attractive, incredibly durable, virtually maintenance-free and can last for more than 50 years. They can also reduce summer cooling costs. However, like any type of roofing project, installing a metal roof can be incredibly expensive. As a result, homeowners may desire to save money by installing their metal roofs themselves.
This May Also Interest You: How Much Does It Cost to Install Metal Roofing?
Despite the inherent dangers and complexity of this project, a sufficiently experienced DIYer — with the necessary equipment — can potentially tackle this project in just a few days. If you’re interested in learning how to install metal roofing yourself, read on to learn how it’s done.
Tools & Materials
Tape measure
Power drill or impact driver
Hammer
Personal protective equipment: fall protection harness, safety glasses, hearing protection, steel-toed boots and work gloves
Garden fork or roofing removal shovel
Nail puller (cat’s paw or pry bar)
Broom
Broom magnet (optional)
Staple gun (optional)
Metal shears or a circular saw with a metal cutting blade
Roofing nails
Self-tapping metal roofing screws
Underlayment
Roof sealant tape
Foam closure strips
Silicone metal roofing sealant
Caulking gun
Metal roofing panels
Eave trim
Flashing
Step 1: Measure Your Roof and Order Materials
Before ordering your roofing materials, you’ll need to calculate the square footage of your roof to determine how much you’ll need.
There are a number of ways to do this, but one of the simplest is to measure the square footage of each individual section of your roof, then add them together to find the combined total. The square footage of square and rectangular areas is found by multiplying the length by the width.
The square footage of triangular areas is determined by multiplying the length of all three sides and dividing that by two.
Start by measuring the largest square or rectangular sections of your roof. Measure the length of the eaves (the edges that extend past the siding) for the width, and the distance between the roof ridge and the eaves for the length. For simple square or rectangular roofs with no additional architectural features, these will be the only measurements you need to take. Once determined, you simply multiply the length and width of each side, then sum up the total of each.
For example, if your roof has two rectangular sides that each have a length of 20 feet and a width of 60 feet, the square footage is 2,400: [20 x 60] x 2 = 2,400
If your home has a sectional roof with various architectural features like ridges (outside corner formed by two adjoining slopes), valleys (inside corner formed by two adjoining slopes) and dormers (protruding structures housing upper-story windows), it may be wise to draw a rough diagram of your roof. That way, you can calculate the square footage of each individual section and sum up the combined total to determine the overall square footage.
If there are irregularly shaped sections (like trapezoids), you can break those down into simpler geometric shapes for easier calculations. For example, the square footage of a trapezoidal area can be broken down into two triangles (one on either side) with a central rectangle — each of which can be measured and calculated separately before being added together.
After determining your roof’s square footage, you can order your roofing materials. Order 10% more than your square footage figure to account for possible waste.
Step 2: Remove the Old Roofing Material
Although it’s possible to install metal roofing over asphalt shingles, it’s often recommended to completely remove the existing material before installing the metal panels. Doing so allows you to inspect and repair the roof’s sheathing (plywood under the shingles), which ensures your new roof will have a sturdy and robust foundation. Removing your old roofing should only be done on dry and sunny days to prevent water damage to the sheathing, so plan your job accordingly.
Using a garden fork or specialty roofing removal shovel, start prying up the shingles from the middle of the roof ridge. Continue working down the roof and out to the eaves until all the shingles are removed. Along with the shingles, the old underlayment (a.k.a, the waterproofing membrane) should also be removed to expose the sheathing underneath.
As a pile of removed shingles and underlayment accumulates, carefully drop it onto a designated collection area on the ground.
Many of the roofing nails will be pulled out with the shingles, but some will be left behind and protrude out of the sheathing. These nails can either be pulled out with a cat’s paw or pry bar, or hammered until the heads are flush with the sheathing.
Once all the shingles, underlayment and nails have been removed, sweep up any residual debris. It’s also a good idea to follow up with a broom magnet to pick up any loose nails you may have missed.
Step 3: Repair Any Damage
Once the roofing material has been removed, the sheathing should be inspected for evidence of moisture damage. This can include sagging, warping and discoloration.
Make minor repairs with roofing adhesives or sealants, and replace full sections of irreparable sheathing with a new sheet.
Step 4: Install the Underlayment
Underlayment is installed on top of roof sheathing to protect it against moisture that may work its way under the metal roofing. Follow the recommendation provided by the manufacturer of your roofing panels when selecting an appropriate underlayment. Rolls of felt roofing paper and self-adhered membranes are among the most common options.
Regardless of the underlayment, it should be unrolled onto the sheathing as flat and wrinkle-free as possible, while staying as square (or perpendicular) to the eaves as possible. Felt paper can be fastened with nails or a staple gun, while self-adhered membranes will immediately adhere to the sheathing when it contacts the adhesive backing. When installing subsequent sections of underlayment, overlap the previous layer by about 6 inches to protect the seams.
More Related Articles:
You Don’t Have to Be Rolling in It to Afford a New Roof: Roll Roofing Installation Costs
What’s a Storm Chaser and Should You Hire Them to Fix Your Roof?
Step 5: Install the Edging
Edging (also called eave flashing or a drip edge) is L-shaped metal flashing that’s installed onto the eaves to protect the perimeter of the roof. Set the edging on the eave until it’s fully seated and overhanging the lip of your gutters by about 1/2 inch. Once in place, secure it to the roof with 1- to 1 1/4-inch roofing nails spaced roughly every 16 inches. If you need to install multiple pieces of edging to cover the full length of an eave, overlap the seams of each piece by 1/4 to 1/2 inch to prevent moisture penetration. Continue until all the eaves are covered with edging.
Step 6: Add Sealant Tape and Foam Closure Strips
In order to keep bugs and water from getting underneath the panels, a foam closure strip — shaped to match and seal the ridges in the corrugated panels — should be installed between the edging and metal roofing panels. Foam closure strips don’t have an adhesive backing, so they need to be secured to roof sealant tape. Run a strip of sealant tape about 1 inch back from the edge of the eave, and press the closure strip on top. Spread a bead of silicone sealant over the top of the strip prior to installing the panel to ensure a watertight seal.
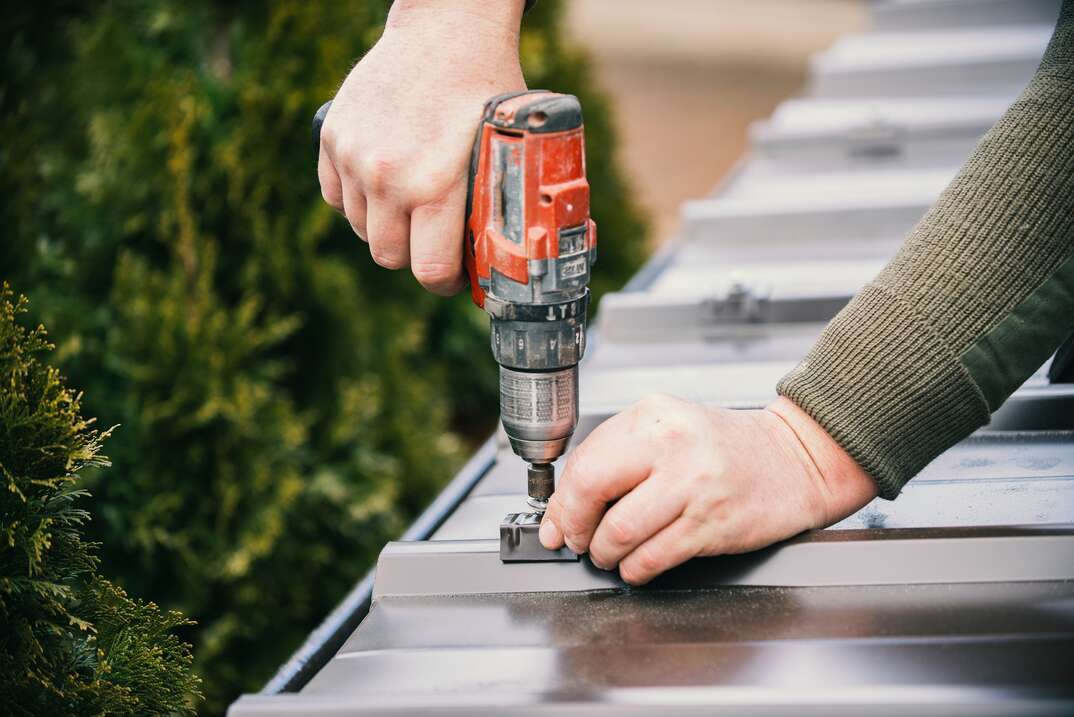
Step 7: Install the Metal Panels
Start at an edge of your roof with the largest square footage between the ridge and eave. Set your first panel onto the roof while overhanging the edge 1/2 to 1 inch past the adjacent eave. Since the first panel will establish the orientation of the following panels, it’s important to set it perfectly square to the roof. You can do this by verifying that the overhang off the eave is perfectly consistent at the top and bottom of the roof. If you have a long enough tape measure, you can also check the distance between the opposite edge of the panel and the other side of the roof to verify they measure the same at the top and bottom.
Use roofing screws to fasten the panel to the roof, beginning at the eave and working your way up to the ridge to avoid buckling the panel. As a general rule, space the screws roughly 12 inches apart into the vertical ribs on the panel. However, you should follow the specific fastening instructions provided by the manufacturer and observe any local hurricane codes. In any case, only tighten the screws down to where the screw’s rubber gasket begins to compress on the panel. Both under- and over-tightening can compromise the screw’s watertight seal.
After the first panel is secure, set your second panel next to it while overlapping the edge by at least one inch. For greater water resistance, apply a bead of silicone roofing sealant underneath the overlapping edge of the second panel, between the seam.
Continue setting and securing panels until the entire roof is covered. If you need to cut panels to fit an irregularly shaped section of your roof, you can either use metal shears or a circular saw with a metal-cutting blade.
Step 8: Install the Flashing
With all your panels in place, the last step is to add metal flashing to protect the exposed seams formed at the ridges and valleys.
The specific angle of these seams will be fairly unique to every roof, so the flashing should be custom-made or manually bent to accommodate these angles. Just like with the edging, the gaps created between the flashing and the metal panels should be sealed with a foam closure strip prior to installation. Run a strip of sealant tape along each side of the ridge, about an inch back from the outside edge of where the flashing will go. Place the closure strip on top of the tape and spread a bead of sealant over the top of the strip.
Center the flashing over the ridge or valley, and press the flashing over the top of both strips. Drive roofing screws every 12 inches on both sides of the flashing, or follow the screwing instructions provided by the manufacturer.
If you need to install multiple pieces of edging to cover the full length of an eave, overlap the seams of each piece by 1/4 to 1/2 inch to prevent moisture penetration. Continue until all the ridges and valleys are covered in flashing.
At this point, your roof should be completely covered in metal. Perform a final inspection to verify there are no exposed sections, and congratulate yourself on a job well done.
View Plans in Your Area
Follow us
Popular


Apr 01, 2024

Apr 26, 2021
Get the latest news, tips and promotional messages, including special offers.