Follow us
How to Install a Basic Lawn Sprinkler System
By James Fitzgerald
October 13, 2021
Sprinkler System Installation at a Glance
Tools & Materials: Marking paint, hacksaw, pipe cutter, PVC primer, glue, shovel, hoe, thread seal tape, trenching machine, hose adapter, poly pipe clamps
Step 1: Check local regulations
Step 2: Test water pressure
Step 3: Draw schematic
Step 4: Map out sprinkler lines and heads
Step 5: Purchase parts
Step 6: Mark layout
Step 7: Dig holes
Step 8: Connect to water supply line
Step 9: Connect zone valves to water supply
Step 10: Lay pipe
Step 11: Install risers and sprinkler heads
Step 12: Install zone valve box
Step 13: Test and check for leaks
Step 14: Backfill holes
Step 15: Mount and connect controller
A lush, green lawn is the hallmark of a thriving landscape. Unfortunately, maintaining a vibrant and healthy lawn can be tedious and time-consuming, especially if you’re relegated to manual watering with a garden hose. Underground sprinkler systems offer an effortless solution for satisfying your lawn’s irrigation needs.
This May Also Interest You: How Much Does a Sprinkler System Cost?
The only problem is that having a sprinkler system professionally installed can be expensive — costing as much as $7,000. If you want to bring the benefits of a sprinkler system to your yard, but you don’t want to spend an arm and a leg doing it, read on to learn how to install a basic lawn sprinkler system yourself.
Part 1: Planning and Preparation
Installing a sprinkler system requires a bit of planning and preparation to ensure it’s installed effectively, efficiently and legally. While many sprinkler system manufacturers will provide you with instructions for each of these steps, the following actions should be taken before you begin installing your system.
Step 1: Check Local Laws and Restrictions
The first step is to check with your local building authority or HOA to see what, if any, laws or restrictions apply to installing a sprinkler system in your yard. You may need to obtain a permit before installing a sprinkler system, or regulations may require that it’s installed by a professional.
Step 2: Test Your Water Pressure and Flow Rate
The water pressure and flow rate of your home’s main water supply will influence the functionality of the sprinkler heads on your system and dictate how many “zones” (areas that are watered together) you need to install.
The water pressure can be checked by connecting a water pressure test gauge to an outside hose spigot. You simply thread the gauge onto the spigot, open the water valve and record the pressure reading on the gauge. Most sprinkler heads are designed to operate between 30 and 40 pounds per square inch. Water pressure below 30 psi can restrict a sprinkler head’s spray distance, while pressure above 40 can damage the sprinkler head or cause the spray to inefficiently mist or fog.
The flow rate is measured in gallons per minute. The easiest way to find the flow rate is with a timer and a bucket measured in gallons (i.e., a 1-, 3- or 5-gallon bucket). To perform the test, turn a hose spigot on full blast and record how many seconds it takes to fill up the bucket.
Multiply the bucket’s capacity in gallons by 60 and divide that sum by the number of seconds it took to fill. If you fill a 5-gallon bucket in 20 seconds, the water supply has a flow rate of 15 GPM.
Most residential water supplies have water pressures and flow rates that will accommodate watering a 1,200 square-foot zone at a time. However, the size of the watering zones will largely depend on the flow ratings of the sprinkler heads you use and the specific characteristics and features of your yard.
Step 3: Draw a Schematic
Next, measure and map your yard to create a schematic for your sprinkler system. Use a measuring reel to measure the individual features of your landscape, including:
Large, square and rectangular sections of grass
Irregularly shaped (circular, long and narrow, etc.) sections of grass
Trees and shrubs
Transfer these measurements onto a piece of graph paper to create a to-scale map of your yard. Using a scale where 1 inch equals 10 feet works well in most cases, unless your yard is particularly large.
Ideally, each of these features should be watered separately on their own zone based on their specific watering requirements, regardless of how large they are.
Step 4: Map Out the Sprinkler Lines and Heads
Once you’ve mapped out your landscape, you can start plotting the sprinkler head and water pipe locations onto the schematic. The water pipe — sprinkler lines — should be installed along the outside perimeter of your lawn, and the sprinkler heads should be installed along the length of the line according to their spray radius and coverage ratings.
There are several different types of sprinkler heads, but pop-up heads are the most common. Some pop-up sprinkler heads have a fixed spray radius, but many have adjustable sprays from 1 to 360 degrees for a customized coverage range. In either case, they usually have a spray distance between 3 and 10 feet, but some can spray considerably further. When determining the coverage your spray heads need, keep in mind that the sprays should overlap to prevent dry or dead spots from developing on your lawn.
Once you’ve decided on what spray heads to use, you can refer to their flow rate capacity to figure out how many zones your system will need. As a general rule, the combined flow rate capacity of each head on the zone shouldn’t exceed your water supply’s flow rate. For example, if your water supply has a 15 GPM flow rate and each sprinkler head has a 3 GPM flow rate, you shouldn’t have more than five of those heads in a single zone.
Step 5: Buy the Parts
With your schematic drawn up, you can start buying the required components for your system. Along with the sprinkler heads, the parts you’ll need are:
Sprinkler Line
Sprinkler lines are the water lines that supply the sprinkler heads with water. They can either be a flexible polyethylene pipe (“poly pipe”) or rigid PVC pipe. PVC is the most common, but poly pipe is often used in colder regions since it’s flexible and less prone to breaking when exposed to freezing temperatures. A sprinkler line’s diameter can be between 3/4 and 1 1/4-inches, depending on the size of your system and your water supply’s flow rate. If you’re unsure which pipe size to purchase, ask an irrigation or plumbing professional.
Zone Valves
Zone valves are responsible for turning the sprinkler heads on and off in each zone. They can either be operated manually by turning a lever or screw on the top of the valve or automatically when connected to a controller. They typically receive power from low-voltage valve wires that go to a controller.
Controller
Also referred to as a “timer,” sprinkler controllers operate the zone valves and can control when and how long the system will run. Controllers are usually installed on an outside wall of the house and supplied with electricity from a wall outlet or hardwired connection.
Backflow Preventer
Prevents the water from the sprinkler system from flowing back into and contaminating your home’s water supply. Some zone valves — like anti-siphon valves — have integrated backflow preventers.
Zone Valve Box
A plastic box that covers the zone valves to protect them from damage.
Pipe Fittings
Pipe fittings connect two or more pieces of pipe together. They’re necessary for making directional turns in sprinkler lines (elbows), connecting straight pipe runs (couplings) and making straight runs of pipe branch off in different directions (tee fittings). When using PVC sprinkler lines, you will need a threaded tee fitting for each sprinkler head and a standard tee fitting for poly sprinkler lines. For both PVC and poly lines, the outlet diameter of the sprinkler’s tee fitting usually needs to be smaller than the sprinkler line to accommodate the sprinkler head.
Risers
Risers connect the sprinkler heads to the sprinkler line and determine the distance the sprinkler head rests above- or below-ground. PVC risers consist of a small section of pipe that’s threaded on both ends, while poly risers use regular poly pipe.
More Related Articles:
Part 2: Sprinkler System Installation
Tools & Materials
The materials mentioned above, plus:
Marking paint
Hacksaw
Pipe cutter
PVC primer and glue
Square-point shovel
Trenching shovel or garden hoe
Thread seal tape
Mechanical trenching machine (optional)
Garden hose adapter (optional)
Poly pipe clamps (optional)
Step 6: Mark the Layout
Use marking paint to layout the following areas:
Sprinkler lines
Each sprinkler head along the sprinkler lines
Zone valve box
Underground utilities.
If you’re unsure where underground utilities are, call 811 to have your local utility company come out and mark them for you.
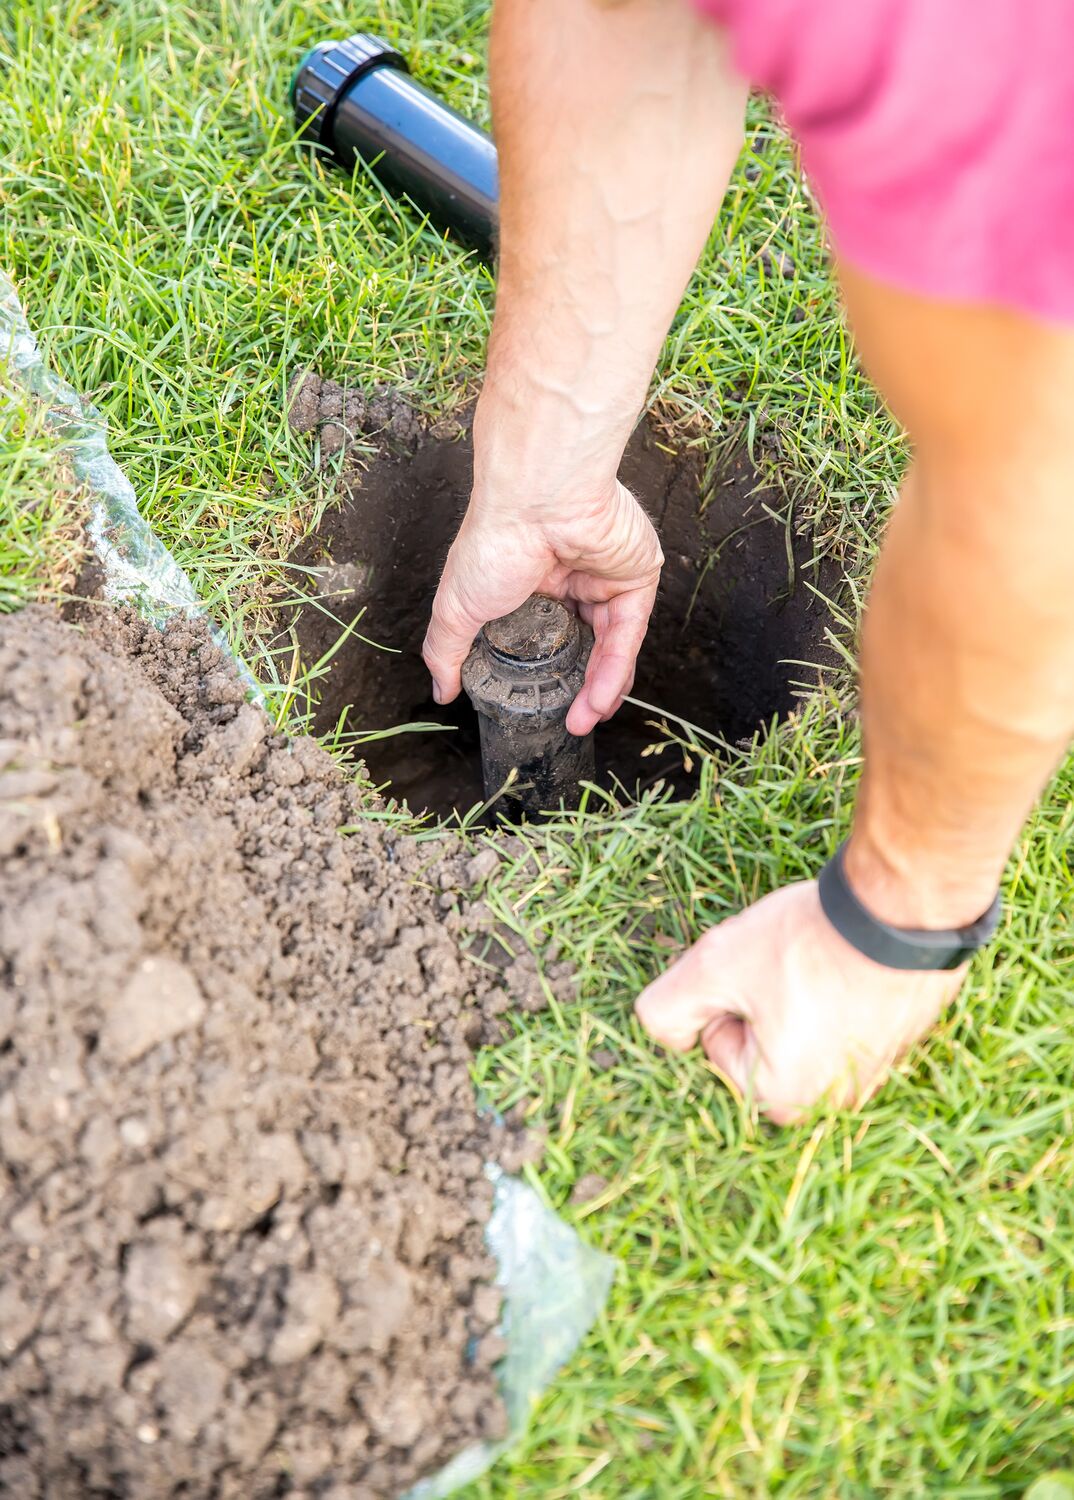
Step 7: Dig the Holes
Use a square-point shovel or gardening hoe to remove four-inch wide chunks of sod from the marked-out areas and set them aside. Do your best to avoid damaging the sod so it can be replaced after the sprinkler system is complete.
With the sod out of the way, use a trenching shovel, garden hoe or mechanical trenching machine to dig a 6- to 12-inch deep trench for the sprinkler line. If you’re using a mechanical trenching machine, manually dig around the utility lines first to avoid damaging them.
Then, dig a hole for your zone valve box. Make it deep enough so that the box’s lid will sit flush to the top of the lawn once the hole is backfilled.
Note: Trenching machines can save a huge amount of time and effort, especially when installing large sprinkler systems. If you decide to go this route, you can rent a trenching machine from many home improvement and equipment rental providers.
Step 8: Connect to a Water Supply Line
For your water supply connection, you can either use an above-ground spigot or an underground main water line. If you’re using a spigot, use a garden hose adapter with the same diameter as your sprinkler line on the outlet side.
If connecting to a main water line, turn off the water at your meter. Cut into the pipe with a pipe cutter or hacksaw and splice in a tee fitting with an outlet diameter the same size as your sprinkler line.
Once you’re tied into a water source, connect a small section of sprinkler pipe from the water supply line to where your zone valve box is located.
Step 9: Connect the Zone Valves to Your Water Supply
Connect the water supply line to each zone valve you’re installing, using the instructions provided by the manufacturer of the valve. If you’re not using an anti-siphon valve with a built-in backflow preventer, install a dedicated backflow preventer between the zone valves and the water supply line.
Step 10: Lay the Pipe
Starting at your zone valves, begin laying the sprinkler lines into the trench with the appropriate fittings. Whenever necessary, use a pipe cutter or hacksaw to cut the pipes.
Connect tee fittings at each point a sprinkler head is being installed, with the open end of the fitting pointing straight up.
If using PVC pipe, thoroughly prime and glue each end of the connection to ensure a watertight seal. For poly tubing, insert the tubing into the barbed portion of the fittings until they’re securely fastened. You can also use pipe clamps for a stronger connection.
Step 11: Install the Risers and Sprinkler Heads
For PVC pipe, apply thread seal tape onto both ends of the risers. Thread one end of the riser into the tee fitting on the sprinkler line, then thread a sprinkler head onto the top of the riser.
For poly pipe, connect a piece of tubing from the tee fitting onto your sprinkler head the same way you attached the rest of the fittings.
In either case, ensure the sprinkler head is inserted by the height above or below ground that’s recommended by the manufacturer.
Step 12: Install the Zone Valve Box
Place the zone valve box over the top of the zone valves and mark around the areas the bottom of the box contacts the sprinkler lines. Measure the height from the bottom of the hole to the top of the sprinkler lines and transfer that measurement onto the marks on the box. Use a hacksaw to cut out the marked-out area on the box for the sprinkler lines to fit around. Place the box over the zone valves and sprinkler lines and make sure it’s level and flush with the surrounding ground.
Step 13: Test the Sprinkler System and Check for Leaks
Turn the sprinkler system on to verify it’s working and check for any leaks. Walk the entire length of the sprinkler line while looking for leaks coming from cracks in the lines or poor connections at the fittings. Turn the water back off once you’re done.
Step 14: Replace the Sod and Backfill the Holes
Finally, bury the sprinkler lines and zone valve box with the dirt you removed, while allowing enough room for the sod to sit flush with the surrounding grass.
Step 15: Mount and Connect the Controller
Since the specific steps involved in wiring the zone valves to the controller can vary, it’s best to follow the instructions provided by each manufacturer. Generally speaking, the process usually involves:
Mounting the controller to the wall
Connecting a length of multi-strand wire to the zone valve wires
Connecting the multi-strand wire to the controller
Configuring the settings on the controller
If you’re uncomfortable performing any of these steps, consider hiring a professional electrician or irrigation professional to do it for you.
Once complete, turn the sprinkler system on to test all the components, make adjustments to the sprinkler heads and let it give your lawn a thorough watering to reestablish the sod.
View Plans in Your Area
Follow us
Popular

Apr 01, 2024

Apr 26, 2021

Get the latest news, tips and promotional messages, including special offers.