Follow us
How to Clean a Bathroom Exhaust Fan
By Team HomeServe
October 22, 2022
Although most people barely give it a second thought, your exhaust fan is the powerhouse of your bathroom. This oft-forgotten appliance removes moisture and odors, helping to prevent mold growth and improve indoor air quality. Therefore, giving your bathroom fan a little TLC once in a while can make your home a safer, more pleasant place to be.
This May Also Interest You: How Much Does It Cost to Install an Exhaust Fan in the Bathroom?
Fortunately, anyone can perform this essential maintenance task with the proper knowledge and a few basic household items.
How Do You Clean a Bathroom Exhaust Fan?
Cleaning a bathroom exhaust fan is a straightforward process that only takes about 20 minutes. Before you start, grab a microfiber cloth, a can of forced air and your vacuum cleaner.
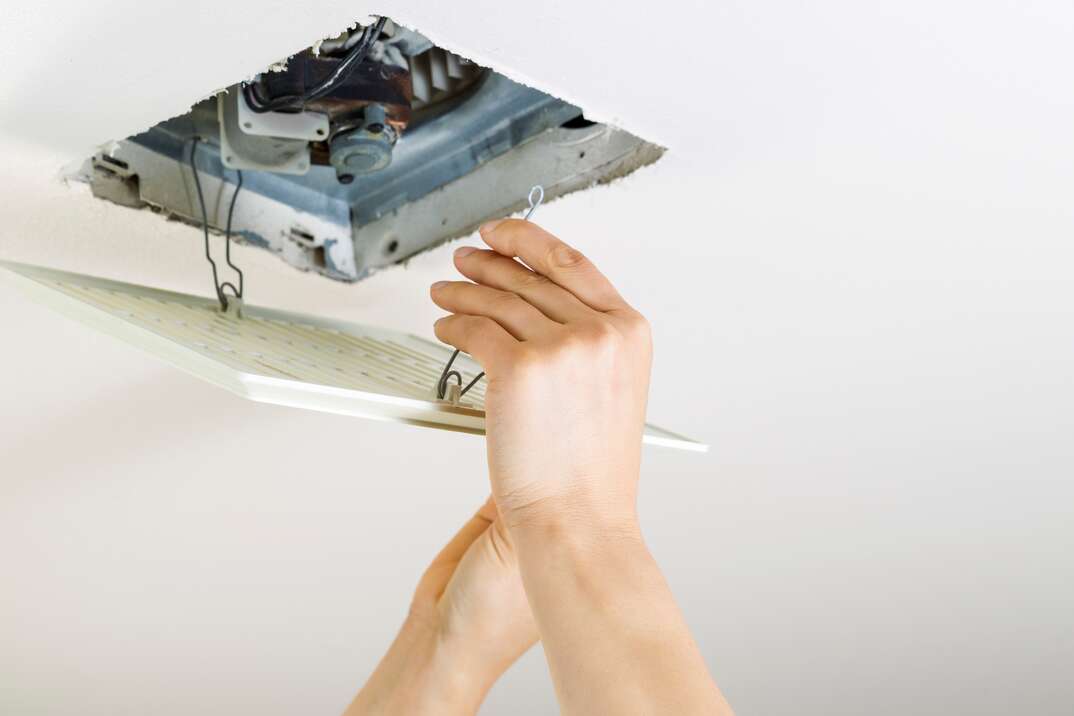
1. Remove and Clean the Vent Cover
It's essential to switch off the power supply to the fan first to avoid an electric shock. Pull the vent cover gently downward until you can access the wire clips, then press the clips together and pull them out of the fan housing.
If your vent cover has a light, you can remove any dirt and dust with a vacuum cleaner and then wipe it with a cloth. Don't submerge it in water, as this can damage the electric components and pose an electric shock risk when you plug the fan back in. If it doesn't have a light, you can wash the cover by scrubbing it thoroughly with warm water and dish soap.
2. Clean the Fan
You can remove dust from the fan itself using the crevice attachment on your vacuum cleaner. Take care not to press too hard against the components to avoid damaging the fan. If the dirt proves stubborn to remove, you can use the brush attachment to loosen grime around hard-to-reach areas. Next, use a slightly dampened cloth to wipe off any caked-on dirt.
3. Clean the Motor
Unplug the fan before removing the small screws that hold the motor in position. Keep the screws somewhere safe, as you'll need them later. It's worth taking a photo to help you remember how the fan fits together, so you can reassemble it easily afterward. The motor will drop out when you remove the screws, so hold it with one hand to stop it from falling on the floor and breaking.
Once you've removed the motor, remove any visible dust with your vacuum cleaner and use a can of forced air to clean the fan blades. You can also wipe the motor with a damp cloth to remove stubborn dirt.
4. Replace the Motor and Vent Cover
First, slot the fan motor back into position and replace the screws to secure it inside the fan housing. Plug the motor in, then slot the mounting wires on the vent cover into the slots on the housing. Finally, push the vent cover back into position.
More Related Articles:
How Often Do You Need to Clean a Bathroom Exhaust Fan?
How often you need to clean your bathroom fan depends on how much you use it. However, it's usually best to clean it roughly every six months to keep it in perfect working order. You should clean your exhaust fan as soon as possible if you notice any of the following:
Condensation on bathroom mirrors and windows
Visible dirt or dust on the vent cover
Odors that linger despite turning the fan on
Moldy surfaces
A thorough cleaning can breathe new life into a malfunctioning bathroom exhaust fan. However, it may be time to replace the unit if you're still noticing excessive moisture, funky smells or mold growth after cleaning and reassembling your fan. Your fan may also make a loud whirring or banging sound as it approaches the end of its lifespan.
Alternatively, you could call a professional to inspect and repair your fan. However, as bathroom exhaust fans typically last no longer than 10 years, it's often more cost-effective to replace the fan than it is to keep repairing an older unit.
View Plans in Your Area
Follow us
Popular


Apr 01, 2024

Apr 26, 2021
Get the latest news, tips and promotional messages, including special offers.