How to Install Kitchen Backsplash in 7 Simple Steps
How to Install Kitchen Backsplash in 7 Simple Steps
Tired of your boring old kitchen? Few projects can update your kitchen as quickly and easily as swapping out the backsplash. It won't even require you to hire a contractor or spend thousands of dollars. You can get impressive results by simply setting aside a weekend and handling it yourself.
This May Also Interest You: How to Paint Kitchen Cabinets
Our easy installation guide will tell you everything you need to know about adding a tile backsplash to your kitchen.
Tools and Materials Needed
The whole process will go a lot more smoothly if you make sure you have the right tools and materials ahead of time. The most important material is the tile itself. Larger tile or tile mosaics pre-mounted on a mesh background tend to be easier to install. Unless you want to fiddle with a bunch of tiny pieces and tile spacers, avoid trying to install a mosaic made up of individual tile pieces.
There are all sorts of great cheap kitchen backsplash ideas, but avoid skimping on the amount of material you buy. Measure your backsplash area carefully — and get a little extra, just in case.
In addition to tile, other materials you need are mortar or tiling adhesive for sticking the tile to the wall and grout to go in between the lines. There are plenty of colors to choose from, but if your tile is glass, white adhesive will help prevent altering the color of the glass. If you’re using unglazed tile, grout sealer will make cleanup easier. Finally, get some flexible caulk in a color that goes with your tile and counter to keep everything waterproof after installation.
Most of the tools you need are just basic home improvement staples. Make sure you have the following things handy:
- A tape measure
- A straightedge
- A level
- A utility knife
- Sandpaper
- Drop cloths
- Buckets
- Washcloths
In addition to these basic implements, you'll need a tool to cut the tile to fit your backsplash area. For backsplash tile under an inch or so, you can just use handheld tile nippers. However, for bigger tiles, it is a good idea to rent a tile cutter from a home improvement shop.
There are some additional tools specifically useful for tile laying:
- Tile spacers make it easier to keep everything lined up.
- A notched trowel will help you spread the tile adhesive smoothly.
- A rubber-lined float allows you to lay down grout.
Tips for Installing a Kitchen Backsplash
To get the best possible results, prep the area well before beginning. You need a clean, level surface to make things easy to install. If it isn't smooth, use a thin layer of joint compound to even out your installation surface. To make cleanup easier, remove outlet covers, tape off electrical outlets or switches, and cover your countertops and any freshly painted kitchen cabinets with drop cloths.
The other important thing is just getting your tile layout planned before you begin. Experiment and see how you need to arrange the tiles to get an even finish. If possible, start installation at the spot where the tile meets the countertop. Since your countertops are mostly level, this helps get a straighter finish. Finally, think carefully about the products you use. Thin-set mortar tends to provide longer-lasting results, but mastic mortar is easier to work with because it comes premixed in the perfect consistency.
Safety First!
Kitchen backsplash installation isn't overly dangerous, but you do work with some powerful tools. To avoid potential injury, you need to be cautious and follow these safety tips:
- Wear gloves and goggles to protect yourself while cutting tile.
- Wear ear protection to prevent hearing damage from noisy blades.
- Wear a mask to avoid breathing in tile dust.
- Be alert while cutting and avoid putting any body part close to the blade.
- Use a scrap of wood to push tile through your tile saw and keep your fingers away from the blade.
- Keep a wet saw lubricated to reduce dust and flying chips.
Step 1: Plan Your Tile Layout
Start by developing a game plan. Think about how you want your tile to look and determine your starting point. If you’re doing a simple repeating mosaic, the best starting point is often at a corner of the wall right above the countertop. However, if your backsplash is going to have focal tiles, you may want to start by laying these at the center point.
To figure out your tile layout, use a straightedge, a level and a tape measure. Remember, your walls will be covered up, so it's perfectly fine to make marks with a pencil. Once you have your layout planned, go ahead and cut your tiles to fit. This makes it easier to lay your tile in one step without having to stop and cut tiles every few minutes.
Step 2: Prepare Your Adhesive
If you’re using thin-set mortar, now is the time to prepare it. Following package instructions, add the correct amount of dry mortar and water to a bucket and mix it thoroughly. Depending on the type you get, you may need to let it stand briefly and then add more water. Typically, this adhesive will last about four hours after mixing. It tends to be one of the most affordable adhesives, and it has very high bonding strength.
Keep in mind that there are alternatives. Some people like premixed tile mastic. There are also kitchen backsplash tiles that come with adhesive pre attached to their backing. If you’re using a peel-and-stick tile setting mat, you can skip ahead to step 4.
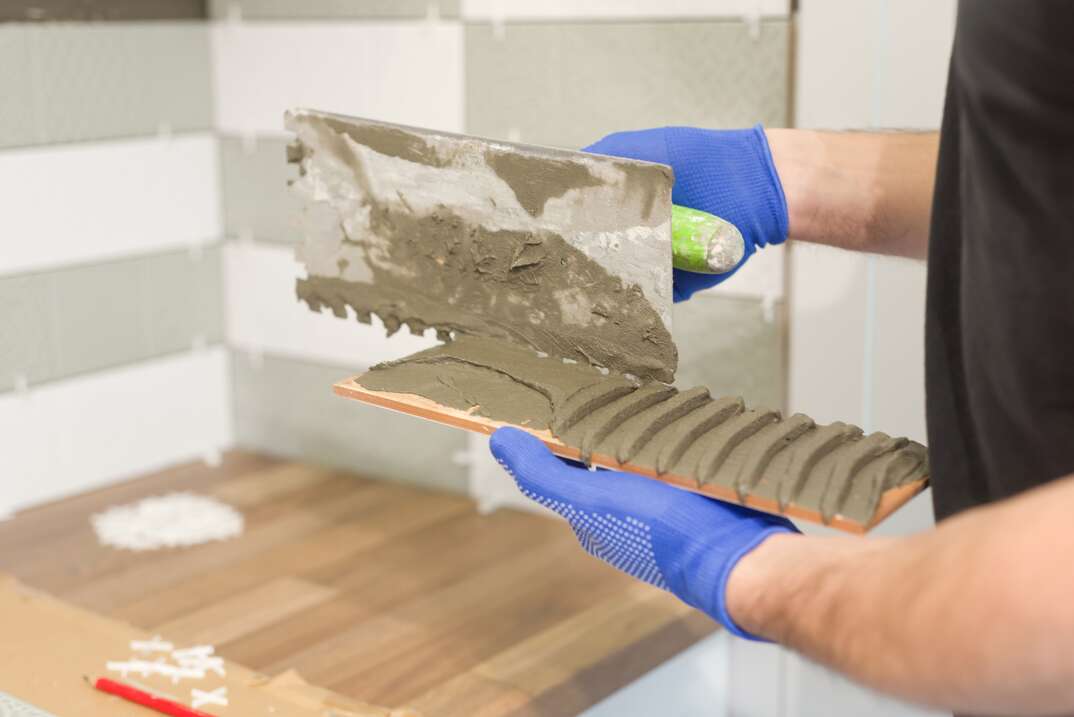
Step 3: Apply Your Adhesive
Use a notched trowel to apply your adhesive to the wall. Place a small amount of adhesive on a notched trowel. Holding it a 45-degree angle, press it against the wall. Use light pressure as you drag your trowel from one side to the other. Make sure you work in single direction to keep things even.
Remember that thin-set and other adhesives set quickly, so avoid covering the whole wall at once. Instead, work in roughly 2-foot sections, applying adhesive and mounting tile. Once you get a rhythm going, you may want to move to slightly larger sections. In between your adhesive applications, use a damp sponge to keep excess mortar from setting on your trowel.
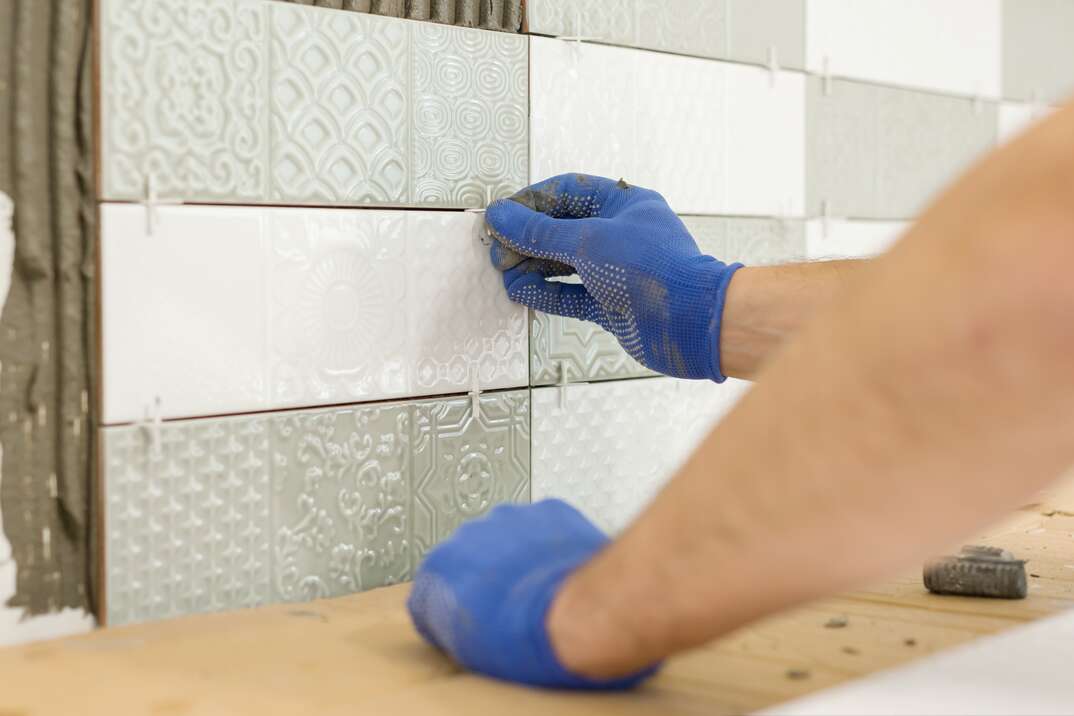
Step 4: Mount Your Tile
Once you have some adhesive applied to the wall, you can start mounting your tile. Following the plan you worked out when dry fitting your tile to the wall, gently place your sheets against the adhesive. To flatten out the ridges and fix your tile into place, gently rock it back and forth. If desired, you can use a rubber float to smooth the tile into place.
As you work, use tile spacers between individual tiles or your precut mosaic sheets. This will ensure you end up with even, level lines. You can also use spacers around the edges of your backsplash. Leave an eighth of an inch gap between your tile and the walls, cabinets or countertops. This will allow your backsplash to flex without cracking.
Continue to alternate between laying down adhesive and attaching tile until your entire backsplash is finished. Allow the area to dry for the recommended amount of time.
Step 5: Mix Your Grout
After your tile adhesive is dry, you can grout. If your tile is natural stone, you may want to apply a sealer before mixing grout. This can prevent staining and make cleanup a little easier.
Mix up your grout according to the package instructions. The right type of grout for the project depends on how far apart your tiles are. For joints under an eighth of an inch, un-sanded grout works well. If the joints are more than an eighth of an inch, go with a polyblend sanded grout.
Mix the grout according to package instructions. Typically, this will involve blending water with grout, allowing it to sit for around 10 minutes, and then, mixing the material again. You may also want to remix the grout periodically while you apply it. This helps keep your grout properly blended. Remember that grout only remains usable for about two hours after mixing, so only blend as much as you need.
Step 6: Apply Your Grout
To apply the grout, place a small amount on a rubber-lined grout float. Holding it at a 45-degree angle, swipe it over your tile. Work in diagonal sections with short, even strokes. Make sure the grout goes fully in between the joints of the tile. After completing an area of a few square feet, you can wipe the extra grout off the tile.
To clean the wet grout off the tile, use a damp sponge and gently rub over the tiles in a circular motion. Avoid using too much water or removing grout from inside the joints. To get the best results, you should not put too much pressure on the tiles. Your goal is just to remove the excess grout from the top of the tiles.
Once you do this, move on to grouting the next section of tile. Allow the grout to dry for about three hours, and then clean the tile one more time. During the final clean, you can use a damp cloth or sponge to remove all traces of grout from the tile faces.
Step 7: Apply Finishing Touches
Expect to wait 24 to 72 hours for your grout to dry fully. Once your grout is dry, you can apply the finishing touches. Use a grout sealer to cover all your grout lines. This keeps your grout from getting stained during normal kitchen activities. Be sure to check the manufacturer's instructions carefully since certain sealers work best with certain grout types.
After sealing, you just need to caulk around the edges of your backsplash. This makes things look tidy, and it keeps water or grease from getting under your countertops or backsplash. Remove all tape, screw on your outlet covers again, and enjoy your beautiful new backsplash.
Once your attractive new backsplash is in place, make sure the rest of your kitchen is protected. With coverage from HomeServe, you don’t have to worry about unexpected costs and hassle. We help you handle repairs for kitchen appliances, plumbing and other home features by matching you with expert technicians in your area. Check out plans from HomeServe now to learn how we can help you keep your kitchen in good shape.