Au Revoir, Standing Water! How to Install a French Drain in 8 Steps
Standing water in the yard — it’s a wet blanket for homeowners. Besides just being an eyesore, standing water can wipe out your grass, leaving your lawn soft and muddy. During the summer months, it can be the perfect breeding ground for mosquitoes and flies. If it’s close to the house, standing water can also weaken your home’s foundation. In the simplest terms: Standing water bad.
This May Also Interest You: Signs of Drainage Problems and How to Fix Them
Low spots and poor drainage are the two major culprits behind standing water. One of the most efficient ways to prevent water from collecting in your yard is to install a French drain.
What Is a French Drain?
While the name may sound exotic — and, therefore, expensive or complicated — French drains can actually be quite simple and cost effective. Done thoughtfully, they can even be a nice aesthetic addition to your outdoor space.
A French drain is essentially a gravel-filled trench containing a slotted or perforated pipe. Surface water seeps into the gravel and into the pipe, which then carries it away, distributing it to a more desirable area. Remember that water always seeks the path of least resistance, and that’s the secret behind a French drain. It creates an easy path to direct water away from low spots in your yard.
French Drain Installation
Is standing water a problem on your property? Your best course of action might be to install a French drain. Luckily, doing so is a reasonably simple task that can be completed by most anyone.
To install a French drain, follow these eight steps and standing water won’t stand a chance:
1. Get the Go-Ahead
Before you begin any construction or landscaping project on your property, it’s always important to confirm your plans with your local zoning department or homeowner’s association, as they may have rules that restrict drainage projects. Either way, it’s prudent to make sure any water you divert stays on your property — even if it’s just to keep your neighbors happy.
Also, be sure you know where any underground cables and other utility lines are in your yard before you start digging. You can call 811, the “call before you dig” hotline, to have a technician come to your home to mark these areas for free. Don’t skip this step, as disturbing a utility line could be both costly and dangerous.
2. Gather Your Tools and Materials
As with any project, you should make sure you have all the proper tools and materials before you begin. Not having all the correct implements during a project can be pretty frustrating and can result in significant delays.
To dig a French drain properly, you’ll need both a spade shovel and a digging shovel, as well as a line level and a tape measure. You’ll also need a perforated plastic drain pipe; the diameter of the pipe should be relative to how much water you need to divert, but keep in mind your pipe will pick up water along the way, so you may need a pipe with a larger diameter than you think. You’ll also need a roll of landscape filter fabric that will work to prevent clogs by filtering out silt and rocks from entering the drain. Finally, you’ll need gravel with which to cover your drain.
3. Plan Your Route
As you determine the best route for your French drain system, it’s important that the path is at least a meter away from any fences or walls and steer clear of any trees or shrubs, as large roots can impede water flow and keep your drain from functioning to its full potential.
While determining your best route, find any downhill slope near where water collects. If you can’t find one, you need to create one by digging progressively deeper as you work. Your best bet is to have at least a 1-foot drop for every hundred feet in length for the drain to work most effectively. Finding the right pitch for your drain can seem complicated, but keep in mind that this doesn’t have to be perfect. Ultimately, you just want to make sure there are no spots along your route where water can collect and pool.
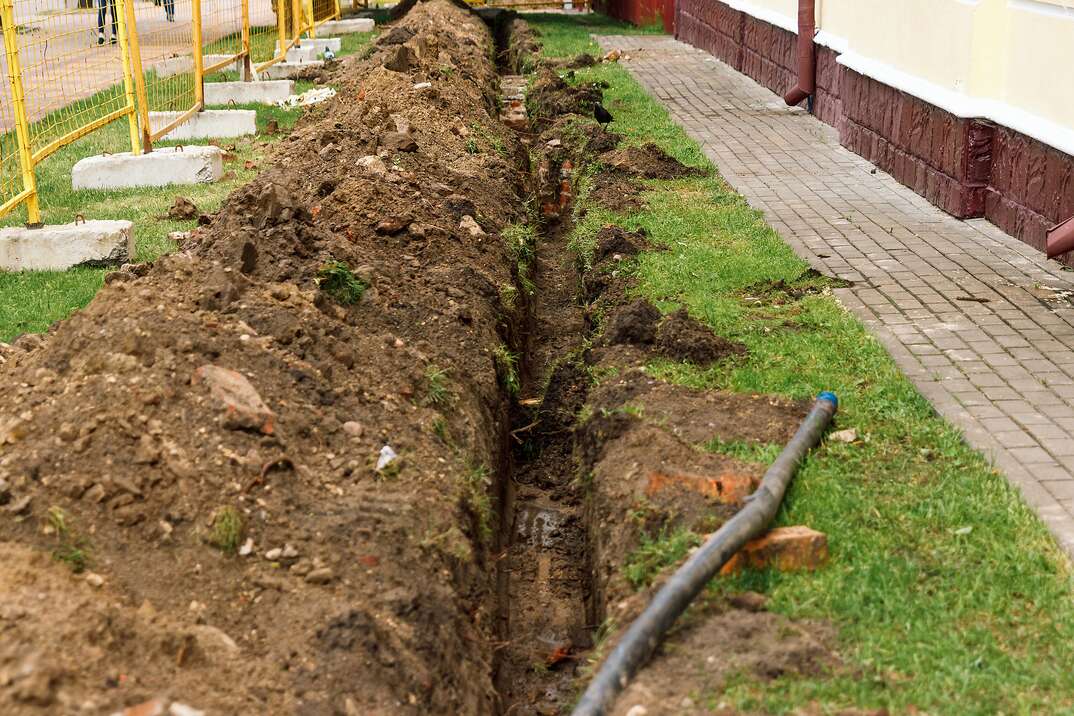
4. Start Digging
At the beginning of the drain, or the spot where water is collecting, you’ll need to dig a mouth that will be slightly larger than the rest of the drain. Of course, the size of your trench will depend how much water you’re draining. However, the standard-size French drain is 6 feet wide and 18 inches deep. Although you may be tempted to dig as deep and wide as possible, it’s far more efficient to dig a so-called V-notch: a triangular trench that’s created by digging two 45-degree angles, which makes a point that’s the deepest part of your trench. Digging a V-notch creates a deep trench without the need to expend too much energy.
5. Line Your Trench With Fabric
After digging the trench, you’ll need to cover it with landscape fabric. Use a continuous swath, if possible, and make sure you leave at least 10 inches of extra fabric on either side of the trench, because the fabric will get pulled down as you add the gravel on top of it.
6. Fill the Trench
Once the fabric is in place, it’s time to fill in the drain with crushed stone, or gravel. This will serve primarily as bedding for your perforated pipe, but it can also act as an additional filter for silt, dirt and other types of small debris that can prevent water flow. You’ll want to make sure you pack at least 3 inches of gravel, here. Take a rake and run it up and down your drain to ensure the gravel is smooth and even. This all helps prevent water to from collecting along the route of the drain.
7. Lay the Pipe
After ensuring that the crushed stone is evenly distributed along the length of the trench, the next step is to simply place the pipe on top of the stone. Although using perforated plastic drain pipe is most common, you also have the option of using a rigid PVC pipe. Although more difficult to work with, PVC will outlive the perforated pipe and can even perform better in the long run. If you choose to work with PVC, make sure you pre-drill holes through the length of the pipe. One important note to remember: French drains work by allowing water to flow up through them from the ground, so keep your drill holes oriented downward.
After you lay your pipe, cover it with additional gravel, but leave at least 5 inches between the top of the gravel and ground level. Then, fold over any excess landscape fabric, which will keep dirt or other debris from disturbing the system.
8. Backfill
Once you’ve laid your pipe, the last step is to backfill the drain with soil. Alternatively, you can cover your pipe with gravel. This keeps the potential for clogs at a minimum by increasing the water filtration of your drainage system.
Ask for Help When You Need It
Although building a French drain can be relatively simple, they aren’t always the only solution to your water drainage issues. If your drain system brings water near your home’s foundation or into a neighbor’s yard, alternative drainage systems like dry wells may better suit your needs. Poorly designed drainage systems can often cause more problems than meet the eye and can negatively impact natural runoff areas.
If you’re still seeing significant standing water after installing your French drain, you may need a large-scale drainage solution that could require re-grading the landscape. Do-it-yourself projects can be rewarding, but it’s always good to know when you need to call a professional.
You may also want to have professionals on-hand to deal with any other issues that may arise with your home systems. That's why being prepared with a plan from HomeServe is something to consider. Once you have a plan in place and a covered issue arises, you can simply call the 24/7 repair hotline. A local, licensed and highly trained contractor will be sent out to you to get the job done to your satisfaction. Learn more about plans from HomeServe today.